Sunday, October 31, 2010

Korean tea

A colleague recently gave me a little plastic bag, assuring me that the contents were vegan. It was an instant drink from Korea that was surprisingly delicious when stirred into hot water.


He also told me where to find a korean supermarket in Paris. I am not totally happy with buying things that have been shipped half around the world, but if they are too good, it happens sometimes.

Luckily, there is a sticker with the ingredients in english on the box:
  • Pinenuts
  • Walunt (Walnut I guess)
  • Almond
  • Jobs tears (Job's tears, some kind of grain)
  • Soybean powder
  • wheat flour
  • Sugar
  • Rice flour
  • Sunflower kernel
  • salt

It is called "tea" on the box, but it is more like a nuts-and-beans milk. Partly powder, partly little nut pieces. I wonder if it would be possible to make the mixture from scratch, without the job's tears maybe? Hmmm... 

For the time being, there are some of the small bags left in the box and I don't need to worry...


Tuesday, October 26, 2010

Conquer your arch-nemesis...ses...es...ies!

For a long time, my arch-nemesis in the world of greenish things was: CELERY! Especially the part that grows underground.


For a while, I had a weekly fruit-and-vegetable box delivered from a local farm. So, one day, a thick round celery root used this box as a trojan horse and landed in my kitchen. While it rolled around my pots, laughing menacingly, I googled and found a possibility to get rid of it that did not sound completely disgusting: celery root cutlets. In fact they were quite tasty, and I buy celery roots now from time to time on my own free will. Or at least I think so...

Preparation time: about 30 minutes
Suggested music: Buffy the Vampire Slayer: The Album & Radio Sunnydale (why? If you're not a Buffy fan, don't worry. If you are, you might recognize something in the title of this entry)

Ingredients:
  • 1 celery root
  • flour
  • water
  • breadcrumbs (french: chapelure <3)
  • oil for frying
  • salt
  • ketchup or mustard
  • something to eat it with (salad, greenthings, whatever you want)

What to do:

Cut the celery root into slices about 1 cm thick and remove the peel (is this a peel? The hard stuff on the outside...). 


Place the slices in a pot and add water until they are covered. Put the pot on the stove and boil the slices for 7-10 minutes. I have heard that it is also possible to make them without boiling, but I know at least one occasion where non-boiled celery root cutlets led to a serious family crisis at the dinner table.

Drain the water and let the slices cool a bit. Prepare the crust: Spread some flour on the bottom of a soup dish or flat bowl. Spread some breadcrumbs on a plate. If you want, add some spices to the latter (salt; or salt later while serving).


Now, mix the flour with a bit of cold water, until all clumps have dissolved. It should be a thick, sticky liquid.


Heat some oil in a pan. Coat the slices first in the flour-water-glop, then in the breadcrumbs. Fry them from both sides in the pan until the crust is golden.


Saturday, October 23, 2010

Lemon Cake

Lemon cake recipe from my mother. Easy and quick, makes one baking tray.


Preparation time: about 45 minutes.
Suggested music: Andreas Scholl - Wayfaring Stranger (I think it sounds kind of lemony... well... )

For the dough:
  • 200 g softened margarine
  • 200 g sugar
  • 3 tablespoons soy flour or ground flax seeds + 3 tablespoons plant milk
  • 100 g corn starch
  • 300 g wheat flour
  • 3 teaspoons baking powder
  • 1/8 L soy milk
  • zest of 1 lemon

For the icing:
  • 200 g icing sugar
  • juice of about 1 lemon

What to do:
  1. Preheat the oven to 175 °C. Place baking sheet on a baking tray.
  2. Mix all the ingredients, thereby sifting the starch (it may form clumps otherwise), forming a not-too-solid cake batter.
  3. Pour onto the baking tray and help it spread evenly.
  4. Bake for 20-30 minutes, until the cake is slightly brown on the top.
  5. Remove from the oven and let cool.
  6. Sift the icing sugar, and add some lemon juice. Mix. Continue to add lemon juice, until you have a pourable icing. Spread on the cake using a baking brush.
  7. Wait until the sugar icing is solid (at least one hour!), cut into pieces and serve.
(This is a smaller baking tray with 2/3 of the ingredients :-) )

Saturday, October 16, 2010

Pasta with pumpkin sauce

Autumn, pumpkin time! We are temporarily reunited in a single kitchen, and hungry, as usual.


Today we made a very delicious (and fast!) pumpkin sauce. It's the veganized assimilated version of a recipe from Miss Kochfrosch. As her blog is in german, here's the translation, together with our changes.

Preparation time: about 30 minutes
Suggested music: This is Halloween (ok, not yet, but pumpkin time!)

Ingredients:
  • 1 red kuri squash (Hokkaidokürbis) of about 800 g
  • 1 onion
  • 1 clove of garlic (or more, but ours was a few weeks old and very intense)
  • oil for frying
  • 250 mL oat cream (Oatly Hafersahne)
  • 300 mL vegetable stock
  • pepper & salt
  • nutmeg
  • lemon juice
  • 2 tablespoons fresh or frozen chives, minced (Schnittlauch - we had no parsil ;-) )
  • 500 g pasta

What to do:
  1. Remove the entrails of the squash and grate the squash pieces coarsely. Dice the onion and mince the garlic. Start heating water for the pasta.
  2. Heat the oil in a large enough pot. Fry onion and garlic, then add grated squash. When squash becomes a little softer, add vegetable stock and cream. Cook for 10 minutes. 
  3. Puree the sauce and season with salt, pepper, nutmeg, lemon juice. Add chives (or parsil) before serving.
We added some vegan almond parmesan from "Käse veganese". It basically contains ground almonds and nutritional yeast. Highly recommended!


Done with taking pictures? Can we finally eat now?? ;-)


Wednesday, October 13, 2010

The soy of it all

Soy is amazing. Soy is the multifunctional holy grail of veganism. Soy milk, tofu, mockmeat - all easy and great, and wonderful bases for thousands of dishes. As often, however, the simplest things are the best: Edamame!


Edamame are young soy beans in their pod. You buy them frozen in an asia store, toss them in boiling water for only a few minutes, drain them and add some salt. Then you can eat them as an appetizer, plopping the edible beans out of the (uneatable) pods. Incredibly yummy! And, strangely, not very common, at least in Germany. Therefore, we mention it here. You can cook other things as well with edamame, but so far we did not manage not to eat them right away.

Preparation time: 10 minutes
Suggested music: Alcest - Écailles De Lune (which has absolutely nothing to do with edamame, but was recommended to my while I was writing this little text by my best music recommendation source :-)youtube)

Sunday, October 10, 2010

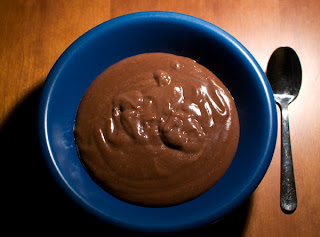
Anti-Weltschmerz chocolate pudding

For one sad and/or lonely person. Immediate improvement guaranteed!


Necessary therapy after watching the documentary "Schmutzige Schokolade" ("The dark side of chocolate") by Miki Mistrati. The filmmaker investigated child labour on cocoa plantations in Côte d'Ivoire.

Further information (german)
Film in der ARD-Mediathek
www.thedarksideofchocolate.org

Preparation time: 10 minutes
Suggested music: Get well soon - Rest Now, Weary Head! You Will Get Well Soon

Ingredients:
The whole point of this recipe is using fair trade cocoa powder, of course. You can likely find it in an organic supermarket, as well as fair trade sugar.


  • 250 mL soy milk (any other plant milk should work as well)
  • 1 1/2 tablespoons sugar (you might need more if you use unsweetened soy milk)
  • 2 tablespoons corn starch
  • 1 tablespoon cocoa powder

What to do:
  1. Heat 200 mL of the plant milk in a small pot on the stove.
  2. Sift the starch and cocoa powder into a bowl, add the sugar, and mix. Sifting helps preventing clumps. 
  3. Add the remaining 50 mL plant milk to the cocoa mixture and whisk until all clumps have disappeared.
  4. When the plant milk comes to a boil, turn the heat down (or even off, depending on your stove) and add the cocoa mixture while whisking. Let it boil shortly - with this amount of starch, it should thicken immediately.
  5. Pour into a small serving bowl, grab a spoon and devour.
This recipe will result in a relatively solid pudding. I like it that way, because I usually eat it hot, directly after preparing it. If you want to prepare the pudding in order to put it in the fridge and eat later, you can use as little as 1 tablespoon corn starch.

Friday, October 8, 2010

Kanelsnurror

Or Zimtschnecken.
Or spiral yeast dough thingies with cinnamon.

Sweden's best invention - who cares about H&M or IKEA when you can have these! ;-)


The recipe is based on one found in a swedish camping guide. Seriously. That is why it uses deciliters (dL). IKEA has the corresponding measuring cups, or use a milliliter scaling (1 dL = 100 mL).
Preparation time: about 2 hours.
Suggested music: Garmarna - Guds spelemän

For the dough:
  • 25 g fresh yeast (or 1 sachet dry)
  • 75 g margarine (german favorite: Alsan)
  • 2 1/2 dL soy milk (or soy rice milk)
  • 1/2 dL sugar
  • pinch of salt
  • 1 teaspoon cardamom
  • 7 dL wheat flour

For the filling:
  • 50 g margarine
  • 1/2 dL sugar
  • 1 teaspoon cinnamon

Decoration (optional):
  • some more soy or soy rice milk
  • decorating sugar (Hagelzucker)

What to do:
  1. Prepare a yeast dough. Mix all the ingredients together. It is easier and faster if the margarine and soymilk are at room temperature. Use a food processor with a dough hook if you are lucky to have one. Put the dough in a bowl at least twice as big as the dough, cover with a kitchen towel and let it rise for 30-60 minutes. (In german, you would say let the dough "go", but that only really happens when your bowl was too small... )
  2. Preheat the oven to 225 °C. Use a rolling pin in order to roll the dough to about 1/2-1 cm thickness in a rectangular shape. Add some flour under the dough in the beginning and while rolling, otherwise the dough will stick to whatever surface is under it.
  3. Mix the ingredients for the filling and spread it on the dough. Then roll the rectangle up starting at its longer side. Cut the roll into 2 cm slices and place them on a baking sheet with parchment paper. Leave a few centimeters between the slices, they will become bigger.
  4. Spread a little bit of soy milk on the top of the slices with a baking brush and add some decorating sugar. Bake for 8-10 minutes, the slices should become slightly brown, but not too dark. If you apply some more soy milk during baking, the surface will be shinier.


Variations:
You can add whatever you like to the filling - jam, ground nuts,... here's an example with ground hazelnuts:


(Some are made by Manuel, some are made by me. That's why they look so different ;-) )